According to dermatology research, dirty makeup brushes can harbor thousands of bacteria per square centimeter — and your eyeliner brush sits right next to the most sensitive skin on your face. If you've ever wondered how to clean eyeliner brush bristles without ruining them, you're not alone. Most people either skip this step entirely or do it wrong. A clean brush gives you sharper lines, protects your eyes from infection, and makes your favorite products last longer. Whether you're deep into a K-beauty skincare routine or just starting out with makeup basics, brush hygiene is non-negotiable.
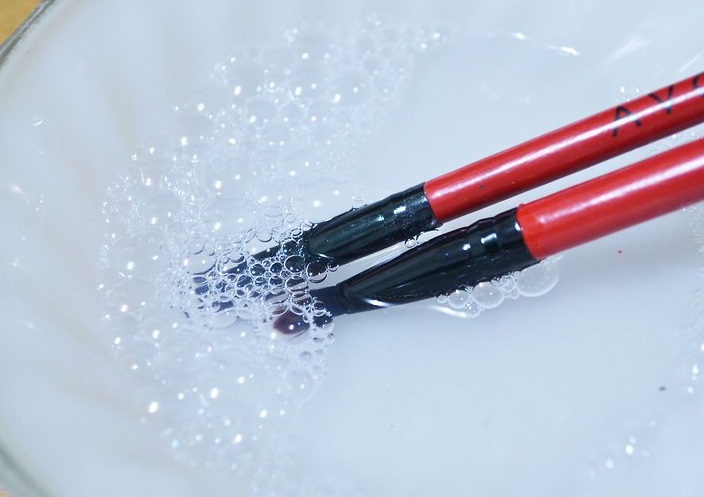
Your eyeliner brush picks up oil, dead skin cells, and old product every single time you use it. That buildup doesn't just affect your liner application — it creates a breeding ground for bacteria that can cause styes, conjunctivitis, and irritation. The good news? Cleaning your brush takes less than five minutes, and you probably already have everything you need at home.
In this guide, you'll learn exactly how to clean every type of eyeliner brush, the best methods for different brush materials, and how to keep your tools in perfect condition between deep cleans. If you care about your eye area skincare, you should care about your brush hygiene just as much.
Contents
Why Your Eyeliner Brush Needs Regular Cleaning
Bacteria and Product Buildup
A study published by the Journal of Applied Microbiology found that used cosmetic brushes can carry bacteria including Staphylococcus and E. coli. Your eyeliner brush touches your lash line — one of the thinnest, most absorbent areas of skin on your body. Here's what accumulates on an uncleaned brush:
- Old eyeliner pigment that hardens and clumps
- Natural oils from your skin and eyelids
- Dead skin cells that flake off during application
- Environmental dust and airborne particles
- Bacteria that multiply in the warm, moist bristle base
How Dirty Brushes Affect Your Liner Game
Beyond hygiene, a dirty brush simply doesn't perform well. Caked-on product stiffens the bristles, making it impossible to draw a smooth, precise line. You end up pressing harder, which tugs at your delicate eyelid skin. If you're investing in quality makeup foundations and products, using them with dirty tools defeats the purpose entirely.
Pro Tip: If your eyeliner looks patchy or uneven despite using a quality product, your brush — not the liner — is almost always the problem.
Cleaning Methods Compared: Which One Works Best?
Method-by-Method Breakdown
Not all cleaning methods are equal. Here's how the most common approaches stack up when you need to clean your eyeliner brush:
| Method | Best For | Drying Time | Deep Clean? | Cost |
|---|---|---|---|---|
| Gentle soap + warm water | All brush types | 2–4 hours | Yes | Low |
| Micellar water wipe | Quick daily clean | Instant | No | Medium |
| Brush cleaning spray | Synthetic bristles | 15–30 min | Partial | Medium |
| Olive oil + soap | Stubborn gel/cream liner | 2–4 hours | Yes | Low |
| Isopropyl alcohol dip | Sanitizing only | 5–10 min | No | Low |
| Silicone cleaning mat | Weekly deep clean | 2–4 hours | Yes | Low (one-time) |
For most people, the gentle soap and warm water method works best for weekly deep cleans, paired with a daily micellar water wipe between uses. If you use gel or cream eyeliners, the olive oil pre-treatment breaks down stubborn product that soap alone can't dissolve.
Best Cleansing Products for Brush Care
You don't need fancy brush cleansers. These everyday products work perfectly:
- Baby shampoo — gentle enough for natural bristles, dissolves most makeup
- Castile soap — plant-based, no harsh chemicals, rinses clean
- Korean water-based cleansers — your favorite water-based cleanser doubles as a great brush cleaner
- Micellar water — perfect for daily spot cleaning between deep washes
How to Clean Eyeliner Brush: Step by Step
Daily Quick Clean
This takes under 30 seconds and keeps your brush fresh between deep washes:
- Spray a cotton pad with micellar water or brush cleaning spray
- Gently swipe the brush back and forth across the pad
- Repeat with a clean section of the pad until no color transfers
- Reshape the bristles with your fingers
- Let it air dry for a few minutes before storing
Weekly Deep Clean
This is the method that truly removes bacteria and deep-seated product. Do this once a week — or every two weeks at minimum:
- Wet the bristles under lukewarm running water, pointing the brush downward so water flows away from the ferrule (the metal band connecting bristles to handle)
- Apply a small drop of baby shampoo or gentle soap to your palm or a silicone cleaning mat
- Swirl the brush in gentle circular motions, working the soap through the bristles
- Rinse thoroughly under lukewarm water until the water runs completely clear
- Squeeze out excess water gently with a clean towel — press, don't twist
- Reshape the tip to its original point or angle
- Lay flat to dry on a clean towel with the bristles hanging slightly off the edge of a counter

Gel and Cream Liner Brushes
Gel and cream eyeliners are oil-based, which means water and soap alone won't cut it. You need an oil-based pre-treatment:
- Place a drop of olive oil or coconut oil on your palm
- Swirl the brush in the oil to dissolve the waxy product
- Wipe the brush on a paper towel to remove the dissolved pigment
- Follow up with the regular soap and water deep clean above
- Rinse until no oily residue remains
This two-step approach works because oil dissolves oil-based products, and then the soap removes the oil. It's the same principle behind the double-cleansing method popular in K-beauty skincare.
Common Brush Cleaning Mistakes You're Probably Making
Water Temperature Errors
Hot water is the number one brush killer. Here's what the wrong temperature does:
- Hot water — melts the glue in the ferrule, causing bristles to loosen and shed
- Cold water — doesn't dissolve product effectively, especially gel and cream formulas
- Lukewarm water — the sweet spot that cleans thoroughly without damaging adhesive
Other common mistakes that ruin brushes fast:
- Submerging the entire brush in water (water enters the ferrule and loosens the glue)
- Using dish soap or harsh detergent (strips natural bristles of moisture)
- Scrubbing too aggressively (splays and breaks fine eyeliner bristles)
- Wringing or twisting wet bristles (permanently deforms the brush shape)
Warning: Never stand your brush upright to dry. Water runs down into the ferrule and destroys the glue — always dry brushes flat or angled downward.
Drying the Wrong Way
How you dry your brush matters just as much as how you wash it. These drying mistakes are surprisingly common:
- Using a hair dryer or heater — heat warps synthetic bristles and dries out natural hair
- Drying vertically in a cup — traps water in the ferrule, leading to handle rot and bristle loss
- Tossing wet brushes in a bag — creates a damp environment perfect for mold and bacteria growth
- Not reshaping before drying — bristles dry in whatever position they land, ruining your precision tip
The best approach is to lay brushes flat on a clean towel at the edge of a counter, with the bristles hanging off the side. Gravity pulls moisture away from the ferrule. Drying takes two to four hours at room temperature. If you're also careful about how you handle your other beauty products — like knowing how to remove lipstick stains properly — the same gentle approach applies to brush care.
Keeping Your Eyeliner Brush in Top Shape
Storage and Travel Tips
Proper storage between uses keeps your clean brush clean. Follow these guidelines:
- Store brushes upright in a holder or cup with bristles pointing up (only when fully dry)
- Keep brushes away from bathroom humidity — a bedroom vanity or drawer is better
- Use brush guards or caps for travel to protect the bristle shape
- Never store brushes in a sealed makeup bag while damp
- Keep eyeliner brushes separate from powder brushes to prevent cross-contamination
If you're someone who takes skincare seriously — maybe you've already found your perfect K-beauty products for oily skin — think of brush maintenance as an extension of that routine. Clean tools are just as important as clean skin.
When to Replace Your Brush
Even with perfect care, brushes don't last forever. Replace your eyeliner brush when you notice any of these signs:
- Bristles splay outward and won't hold their original shape after washing
- The ferrule feels loose or wobbles on the handle
- Bristles shed regularly during application
- You can't get the brush fully clean even after a deep wash
- The brush feels scratchy or irritating against your eyelid
A quality eyeliner brush should last six months to a year with weekly cleaning. Cheap brushes may need replacing every two to three months. Investing in a well-made brush actually saves money over time because it holds up to regular cleaning without falling apart.
Frequently Asked Questions
How often should you clean your eyeliner brush?
Do a quick clean with micellar water after every use, and a full deep clean with soap and lukewarm water once a week. If you use your brush daily with gel or cream liner, deep clean it twice a week to prevent heavy product buildup.
Can you use rubbing alcohol to clean an eyeliner brush?
Rubbing alcohol sanitizes but doesn't remove product buildup effectively. It also dries out natural bristles over time. Use it only as an occasional spot-sanitizer between soap-and-water deep cleans, not as your primary cleaning method.
What soap is best for cleaning eyeliner brushes?
Baby shampoo and castile soap are the top choices. They're gentle enough for both natural and synthetic bristles, dissolve most makeup formulas, and rinse clean without leaving residue. Avoid dish soap or antibacterial hand soap — they're too harsh.
How do you clean a dried-out gel eyeliner brush?
Start with a drop of olive oil or coconut oil on your palm. Swirl the brush in the oil for 30 seconds to dissolve the hardened gel, wipe on a paper towel, then follow with a regular soap and warm water wash. The oil breaks down the waxy formula that water alone can't touch.
Can you share eyeliner brushes with friends?
No. Sharing eye makeup brushes transfers bacteria directly to the eye area, increasing the risk of infections like conjunctivitis and styes. Each person should use their own brushes, especially for eye products.
How long does it take for an eyeliner brush to dry after washing?
Expect two to four hours for a small eyeliner brush to dry completely at room temperature. Thicker, denser brushes may take longer. Never use heat to speed up drying — it damages bristles and warps the brush shape.
Do synthetic or natural bristle eyeliner brushes last longer?
Synthetic brushes generally last longer because they resist moisture damage and don't absorb product as deeply. Natural hair bristles feel softer but break down faster with regular washing. For eyeliner specifically, synthetic is the more durable and hygienic choice.
Is it worth buying a brush cleaning mat?
Yes, especially if you clean multiple brushes. Silicone cleaning mats have textured ridges that work product out of bristles more effectively than your palm alone. They cost a few dollars and make the process faster and more thorough.
Key Takeaways
- Clean your eyeliner brush weekly with gentle soap and lukewarm water to prevent bacteria buildup and eye infections.
- Always dry brushes flat with bristles hanging off a counter edge — never upright, and never with heat.
- Use an oil pre-treatment for gel and cream liner brushes before washing with soap, since water alone won't dissolve oil-based formulas.
- Replace your brush when bristles splay permanently, shed during use, or the ferrule feels loose — typically every six months to a year with proper care.


About Austin Park
Austin Park is a Korean beauty enthusiast and product researcher who has spent years studying the K-beauty industry — tracking ingredient trends, comparing formulations, and evaluating how Korean skincare and cosmetic brands perform for a wide range of skin types. His research-driven approach to product evaluation focuses on ingredient lists, brand transparency, and real-world results rather than marketing claims. At BestKoreanGuide, he covers Korean skincare routines, product reviews, and ingredient guides for readers building their first K-beauty routine or expanding an existing one.
You can get FREE Gifts. Or latest Free phones here.
Disable Ad block to reveal all the info. Once done, hit a button below